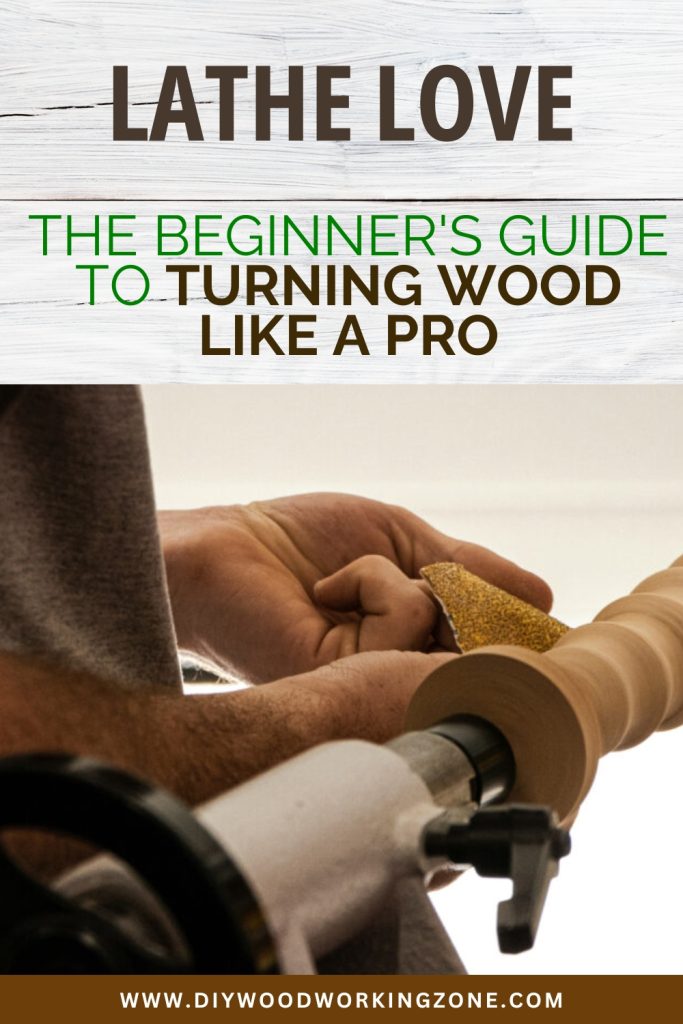
Lathe Love: The Beginner’s Guide to Turning Wood Like a Pro

What is a Woodworking Lathe?
A woodworking lathe is a fantastic tool that lets you shape wood into symmetrical, rounded, and detailed designs by spinning it against a sharp cutting tool. Think of it as a potter’s wheel for wood—except instead of clay, you’re sculpting sturdy, beautiful wooden pieces! Whether you want to craft bowls, table legs, or even pens, a lathe makes it possible with precision and ease.
Understanding the Basics of a Wood Lathe
A wood lathe is like a magic wand for woodworking—it transforms rough chunks of wood into sleek, symmetrical, and polished pieces. But before you dive in, let’s break down the basics. A lathe has a motor that spins the wood, a tool rest where you position your chisels, and a tailstock that holds everything steady. The speed of the spin can be adjusted depending on the type of work you’re doing. Think of it like a DJ turntable—too slow, and nothing exciting happens; too fast, and you might lose control! The trick is to find the right rhythm. Once you get comfortable with how it works, you’ll be amazed at how effortlessly you can shape wood into bowls, pens, or even table legs.
Why a Lathe is a Game-Changer for Woodworkers
If you’ve ever tried shaping wood by hand with a chisel and hammer, you know how much of a workout it can be. It’s like trying to carve a turkey with a butter knife—frustrating and time-consuming! A woodworking lathe takes all that struggle and turns it into a smooth, almost meditative process. Instead of hacking away for hours, you let the lathe spin the wood while you gently guide your tools. This not only saves time but also allows for extreme precision. Plus, it opens up creative possibilities you never knew existed. Whether you want to craft elegant chair legs, intricate candle holders, or even custom tool handles, a lathe makes it all possible with ease and efficiency. It’s the kind of tool that once you try, you’ll wonder how you ever lived without it.
Choosing the Right Woodworking Lathe
Size Matters: Mini vs. Full-Size Lathes
When picking a woodworking lathe, the first thing you’ll notice is that they come in different sizes. It’s kind of like choosing between a compact car and a full-size truck—both get the job done, but one is better suited for smaller tasks while the other can handle the big stuff. A mini lathe is perfect for beginners because it’s small, affordable, and great for projects like pens, handles, and small bowls. If you’re short on space or just testing the waters, a mini lathe is a solid choice. On the other hand, a full-size lathe is the beast of the workshop. It’s built for larger projects like table legs, big bowls, and furniture components. If you know you’ll be working on hefty pieces, investing in a full-size lathe will save you headaches down the road. The key is to match your lathe size to your projects—bigger isn’t always better, and small doesn’t mean limited!
Key Features to Look for in a Lathe
Buying a woodworking lathe is a bit like picking out a new car—you want one with the right features for your needs. The most important factor is motor power. If you’re working on small projects, a 1/2 HP motor will do just fine. But for larger, more demanding work, you’ll want at least 1 HP to keep things running smoothly. Variable speed control is another game-changer. Being able to adjust the speed lets you work more precisely, reducing the chances of chipping or damaging the wood. Also, pay attention to build quality—a sturdy, well-made lathe will vibrate less and give you cleaner cuts. And don’t forget about the tool rest—a good one allows for smooth movement of your chisels, making your turning experience way more enjoyable. Get a lathe with these features, and you’ll set yourself up for success right from the start.
Best Beginner-Friendly Woodworking Lathes
Choosing the right lathe as a beginner can feel overwhelming—kind of like standing in front of a menu with too many options. But don’t worry, I’ve got you covered. If you want something solid, reliable, and beginner-friendly, check out the JET JWL-1221VS. It’s smooth, quiet, and has excellent speed control. Another great pick is the Delta 46-460, which offers a strong motor and user-friendly adjustments. If you’re on a budget, the WEN 3424T is a fantastic entry-level option that won’t break the bank but still delivers great performance. Whatever you choose, make sure it fits your project needs and workshop space. And remember, the best lathe is the one that gets you excited to start turning! For a more detailed comparison, check out this helpful video.
Essential Tools and Accessories for a Woodworking Lathe
Must-Have Turning Tools for Beginners
You wouldn’t go fishing without a rod, right? The same goes for woodturning—you need the right tools. First up is the roughing gouge, your go-to tool for shaping rough, blocky wood into something more manageable. Then there’s the spindle gouge, which helps you add details and curves. The parting tool is a must-have for cutting and separating pieces. If you want to go beyond the basics, a bowl gouge is great for hollowing out bowls, and a skew chisel is perfect for getting those ultra-smooth finishes. Start with the essentials, and as you gain confidence, build up your collection. A well-sharpened tool is the secret to clean cuts and frustration-free woodturning!
Safety Gear and Precautions
Let’s be real—woodturning is fun, but safety should always come first. A spinning chunk of wood can be unpredictable, and the last thing you want is a face full of splinters! Always wear safety goggles or a face shield to protect your eyes. A dust mask is crucial because fine wood particles can be nasty for your lungs. And don’t forget hearing protection—lathes can be louder than you’d expect, especially in a small workspace. Another tip? Avoid loose clothing and jewelry; you don’t want anything getting caught in a spinning lathe. Trust me, a little caution goes a long way in making sure you enjoy woodturning without any scary mishaps.
Accessories That Make Woodturning Easier
Want to make your woodturning experience smoother? Investing in a few key accessories can take your skills up a notch. A sharpening system is a must-have because dull tools make rough cuts and increase the risk of accidents. A good tool rest helps you position your chisels more comfortably, leading to better control. Also, consider a sturdy workbench—a wobbly surface makes precision nearly impossible. If you’re planning to work on a lot of bowls, a chuck is a game-changer for holding pieces securely. Think of these accessories as your woodturning support crew—they make everything easier and more enjoyable!
Getting Started with Your Wood Lathe
Setting Up Your Lathe for the First Time
Setting up your lathe for the first time is a little like setting up a new gaming console—you’re eager to get started, but taking the time to do it right makes all the difference. First, make sure your woodworking lathe is on a stable, level surface. Even a slight wobble can throw off your precision and lead to frustrating results. Next, check that all the parts—the tool rest, tailstock, and headstock—are securely locked in place. Once that’s done, plug it in, but don’t start spinning just yet! Before turning it on, do a quick test spin by hand to ensure nothing is out of alignment. Finally, pick a piece of practice wood, set your speed to low, and start with simple cuts. The key here is patience—get comfortable with your setup before diving into detailed projects, and you’ll save yourself a ton of headaches later!
Selecting the Right Wood for Turning
Not all wood is created equal when it comes to turning. Some types carve like butter, while others fight you every step of the way. If you’re just starting out, go for softwoods like pine or cedar—they’re easy to shape and great for practice. But if you want cleaner cuts with less tear-out, hardwoods like maple, cherry, or walnut are fantastic choices. Avoid wood with knots, cracks, or irregular grain, as these can make turning unpredictable. Also, keep in mind that dry, seasoned wood is best for precise, smooth results, while green (fresh) wood is easier to shape but tends to warp as it dries. Think of it like baking—choosing the right ingredients (or wood) makes a world of difference in the final outcome!
Understanding Speeds and Settings
Speed control is one of the most important aspects of woodturning, and getting it right is like finding the perfect driving speed—not too slow, not too fast. If you’re working on small, delicate pieces, start with a higher speed, around 1,500-3,000 RPM. For larger, heavier projects, go lower, typically around 500-1,200 RPM—this prevents wobbling and potential accidents. Always start slow and increase speed gradually. And if your lathe starts vibrating like an old washing machine, that’s a sign you need to dial it down. Pay attention to how the wood reacts, and soon you’ll develop an instinct for the perfect speed for each project.
Simple Woodturning Projects for Beginners
Making a Wooden Pen
Turning a wooden pen is one of the most satisfying beginner projects—it’s quick, fun, and makes an awesome gift! First, grab a pen kit and a small blank of hardwood like walnut or maple. Drill a hole through the blank and insert the brass tube from the kit. Secure the blank on the lathe and start shaping it with a spindle gouge, slowly refining the shape to match your design. Once it’s the perfect shape, sand it smooth, apply a finish for that sleek, polished look, and assemble the pen pieces. Before you know it, you’ll have a one-of-a-kind, handcrafted pen that looks like something straight out of a fancy stationery shop!
Crafting a Small Bowl
Making a wooden bowl is a rite of passage for any woodturner—it’s like your first big test. Start with a bowl blank, preferably from a hardwood like maple or cherry. Mount it securely on a faceplate or chuck, then use a bowl gouge to slowly shape the outside. Once you’re happy with the form, hollow out the inside using light, controlled cuts. Take your time—rushing can lead to catches and gouges in the wood. After shaping, sand it smooth and apply a food-safe finish if you plan to use it in the kitchen. The best part? Seeing that raw block of wood transform into a stunning, handcrafted bowl right before your eyes!
Turning a Wooden Handle
A custom wooden handle can add a personal touch to your tools, kitchenware, or even a walking cane. Start by choosing a solid, durable wood like hickory, oak, or maple—something that feels good in the hand. Mount the blank between the lathe’s centers, then use a roughing gouge to shape it into a smooth cylinder. From there, design your handle with curves, ridges, or whatever fits best for your project. Once it’s shaped, sand it down and apply a finish that enhances both grip and durability. Before you know it, you’ll be replacing all your old handles with your own custom designs!
Tips and Tricks for Smooth Woodturning
Avoiding Common Beginner Mistakes
Every beginner makes mistakes, but knowing them ahead of time can save you a lot of frustration. One of the biggest errors is using dull tools—a sharp chisel makes a world of difference! Another common mistake? Starting at the wrong speed—going too fast can be dangerous, while going too slow can cause rough, uneven cuts. Also, don’t forget to check that your wood is properly secured before you start turning—there’s nothing worse than a piece flying off mid-spin! Lastly, be patient. Woodturning is a skill that takes time to master, so don’t expect perfection right away. Embrace the learning process, and most importantly, have fun with it!
How to Get a Smooth Finish on Your Projects
There’s nothing more satisfying than a silky-smooth wooden surface, but getting there takes a bit of know-how. The secret? Sanding in stages. Start with a coarse grit (around 80-100 grit) to remove tool marks, then gradually work your way up to 220-400 grit for a fine, polished feel. If you really want a mirror-like finish, try wet sanding with a little mineral oil. Once it’s smooth, apply a finish like Danish oil, shellac, or friction polish to bring out the wood’s natural beauty. Take your time with this step—it’s the final touch that makes your project stand out!
For more expert woodturning finishes, check out this great resource.
Conclusion
Woodturning is one of the most satisfying crafts out there. With the right tools, a bit of patience, and some practice, you’ll be creating stunning wooden pieces in no time. Whether you start with a small project like a pen or take on a larger challenge like a bowl, every turn of the lathe brings you closer to mastery. So, go on—embrace the lathe love and start turning wood like a pro!
FAQs
- What’s the best wood for beginners to use on a lathe?
Softwoods like pine or beginner-friendly hardwoods like maple and cherry are great choices. - How fast should my lathe spin?
It depends! Lower speeds (500-1000 RPM) are best for rough shaping, while higher speeds (1500-3000 RPM) create smooth finishes. - Do I need expensive tools to start woodturning?
Not at all! A basic lathe and a few essential chisels are enough to get started. - How do I sharpen my lathe tools?
Using a grinding wheel or a sharpening jig will keep your tools razor-sharp and ready for smooth cuts. - Can I turn metal or plastic on a wood lathe?
Wood lathes are designed for wood, but with the right tools, you can turn soft plastics. Metal requires a specialized lathe.
Now, grab your lathe and start creating!